Configure Telnet on a Cisco Switch with Only a Password
Telnet is a protocol used for remote management of network devices such as switches and routers. In this guide, we will configure Telnet on a Cisco switch with a simple password-based authentication. This setup is useful for basic remote administration but should be used cautiously due to its lack of encryption.
Network Topology
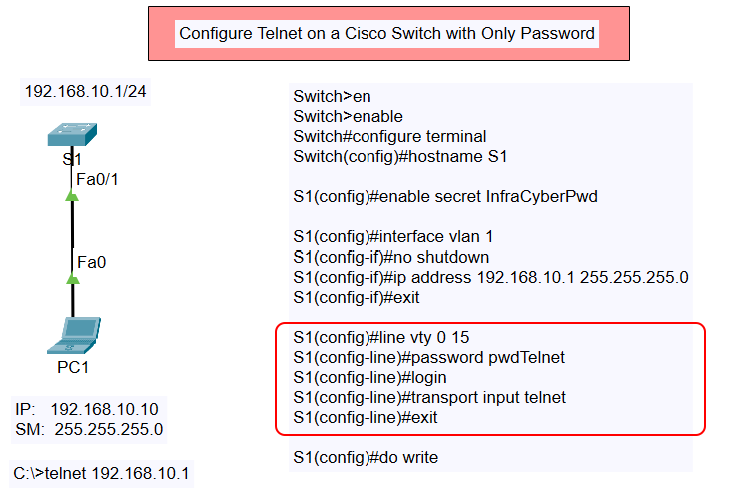
Our network consists of:
- A Cisco Switch (S1)
- A PC (PC1)
- A direct connection between the switch and PC
- IP Addressing:
- Switch VLAN 1:
192.168.10.1/24 - PC1:
192.168.10.10/24
- Switch VLAN 1:
Benefits of Configuring Telnet
- Enables remote access to the switch from a PC.
- Allows basic switch management without needing a direct console connection.
- Useful for quick troubleshooting and configuration changes.
Step-by-Step Configuration
Step 1: Access the Switch CLI
Connect to the switch via the console and enter privileged mode:
Step 2: Enter Global Configuration Mode
Step 3: Set a Hostname
Assign a hostname to the switch for easier identification:
Step 4: Set an Enable Password
This ensures secure access to privileged EXEC mode:
Step 5: Configure VLAN 1 with an IP Address
Since Telnet requires an IP address, configure VLAN 1 as the management interface:
Step 6: Configure Telnet Access
Enable Telnet on virtual terminal (vty) lines:
Step 7: Save the Configuration
Ensure the settings persist after a reboot:
Step 8: Test the Telnet Connection
On PC1, open the command prompt and initiate a Telnet session:
Enter the password pwdTelnet when prompted.
Conclusion
This setup allows remote switch access via Telnet with a password for authentication. However, Telnet is not secure as it transmits data in plaintext. For a more secure approach, consider using SSH (Secure Shell) instead of Telnet.