Configure Basic VLAN and Assign Ports on a Cisco Switch
In modern networking, VLANs (Virtual Local Area Networks) play a critical role in segmenting networks, improving security, and managing traffic effectively. A VLAN is essentially a logical grouping of devices on a network that can communicate with each other as if they were on the same physical network, even if they are spread across multiple physical locations. This tutorial demonstrates how to configure basic VLANs on a Cisco switch and assign switch ports to these VLANs.
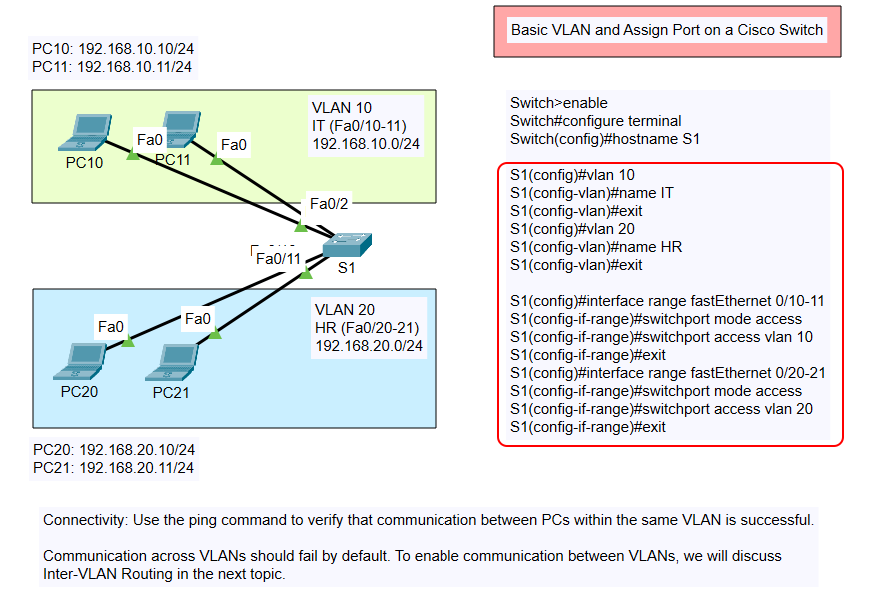
We’ll be working with a simple network topology consisting of a single switch and multiple PCs divided into two VLANs. By the end of this tutorial, you’ll be able to set up VLANs and verify their functionality using basic connectivity tests.
Network Topology Overview

The topology used in this scenario is as follows:
VLAN 10 – IT Department
- Hosts: PC10, PC11
- IP Address Range: 192.168.10.0/24
- Switch Ports: FastEthernet 0/10 and 0/11
VLAN 20 – HR Department
- Hosts: PC20, PC21
- IP Address Range: 192.168.20.0/24
- Switch Ports: FastEthernet 0/20 and 0/21
The goal is to isolate the traffic between these two VLANs, meaning devices in VLAN 10 should not be able to communicate with devices in VLAN 20. This isolation ensures better security and minimizes unnecessary broadcast traffic between departments.
Other types of VLAN Configuration
- Configure Basic VLAN and Assign Port on a Cisco Switch
- Configure Basic VLAN and Trunking on 2 Cisco Switches
Why Use VLANs?
Before diving into the configuration, let’s understand why VLANs are essential:
- Improved Security: VLANs create boundaries within the network. Sensitive data from the HR department, for instance, can remain inaccessible to the IT department unless explicitly allowed.
- Reduced Broadcast Domains: By segmenting the network, VLANs reduce broadcast traffic. This leads to improved performance, as broadcasts are confined within each VLAN.
- Simplified Network Management: VLANs logically group devices regardless of their physical locations, making it easier to manage large networks.
- Efficient Use of Resources: VLANs optimize the use of network bandwidth by isolating traffic.
Step-by-Step Configuration Guide
Here’s how to configure VLANs and assign switch ports step by step:
1. Access the Switch
Connect to the switch using the console cable or remotely via Telnet/SSH. Log in to the privileged EXEC mode.
2. Enter Global Configuration Mode
Enter global configuration mode to begin setting up the switch.
The hostname command renames the switch to “S1” for easier identification in larger networks.
3. Create VLANs and Assign Names
We’ll create two VLANs: one for the IT department and one for the HR department. Naming VLANs helps in understanding their purpose.
At this stage, the VLANs exist in the switch’s VLAN database but are not yet associated with any specific ports.
4. Assign Ports to VLANs
Next, we assign the switch ports to their respective VLANs. Ports must be in access mode to belong to a specific VLAN.
- Assign FastEthernet 0/10 and 0/11 to VLAN 10:
- Assign FastEthernet 0/20 and 0/21 to VLAN 20:
Verifying Configuration
Once the VLANs are configured and ports are assigned, it’s essential to verify the setup.
1. Display VLAN Information
Use the following command to view VLAN details:
This command lists all VLANs, their assigned ports, and the VLAN status.
2. Test Connectivity Within VLANs
From a device in VLAN 10 (e.g., PC10), test connectivity with another device in the same VLAN (e.g., PC11). Similarly, test connectivity between devices in VLAN 20.
- Ping Test Example: On PC10, run:
On PC20, run:
3. Test Connectivity Between VLANs
At this stage, devices in VLAN 10 cannot communicate with devices in VLAN 20, as VLANs are isolated by design. This is expected behavior and confirms the VLAN segmentation is working correctly.
Common Troubleshooting Tips
- Ports Not in the Correct VLAN: Ensure the correct ports are assigned to the appropriate VLANs using the
show vlan briefcommand. - Ping Fails Within the Same VLAN: Check the devices’ IP configurations and ensure they belong to the same subnet.
- VLAN Not Active: Make sure the VLAN is active and correctly configured on the switch.
Practical Use Cases for VLANs
- Departmental Segmentation: As shown in this tutorial, VLANs can segment departments like IT, HR, and Finance, ensuring data confidentiality and better traffic management.
- Guest and Corporate Network Separation: VLANs can separate guest Wi-Fi traffic from the corporate network to enhance security.
- Voice and Data Traffic Separation: VLANs can prioritize voice traffic over data traffic in a network to ensure smooth communication.
- Testing Environments: VLANs allow developers to isolate testing environments from the production network.
Advanced Topics: Inter-VLAN Communication
While VLANs provide isolation, there are scenarios where devices from different VLANs need to communicate. For example, a server in VLAN 10 might need to provide services to devices in VLAN 20.
To enable this, Inter-VLAN Routing is required. This involves:
- Configuring a router-on-a-stick setup.
- Using a Layer 3 switch to handle routing between VLANs.
Inter-VLAN routing will be covered in detail in the next article.
Conclusion
In this tutorial, we configured basic VLANs and assigned switch ports to these VLANs on a Cisco switch. VLANs are a powerful tool for network segmentation, offering improved security, reduced broadcast traffic, and efficient network management.
By following these steps, you can ensure your network is organized and optimized for performance. For networks with multiple VLANs that require communication, stay tuned for our guide on Inter-VLAN Routing.