Configure Static Routing IPv4 with Next Hop IP
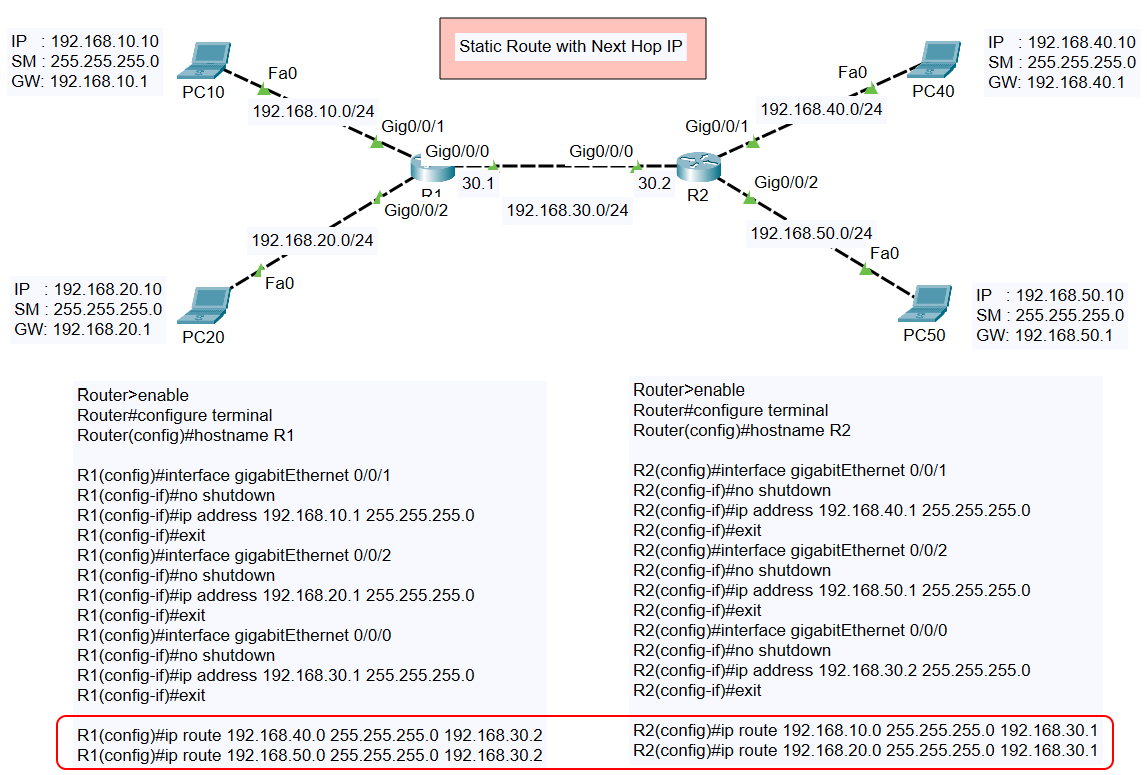
Static routing is an essential concept in networking that enables manual configuration of routes to control traffic between different networks. In this guide, we’ll demonstrate how to configure static routing using next-hop IP addresses based on the topology provided.
Static Routing IPv4
- Configure Static Routing IPv4 with Next Hop IP
- Configure Static Routing IPv4 with Exit Interface (Point to Point – Serial Interface)
- Configure Static Routing IPv4 with Fully Specified Route
Network Topology Overview

The topology consists of:
- Two Routers (R1 and R2):
- Connected via the 192.168.30.0/24 network.
- Four Subnets attached to the routers:
- 192.168.10.0/24 (PC10)
- 192.168.20.0/24 (PC20)
- 192.168.40.0/24 (PC40)
- 192.168.50.0/24 (PC50)
IP Address Assignments
| Device/Interface | IP Address | Subnet Mask |
|---|---|---|
| PC10 (Fa0) | 192.168.10.10 | 255.255.255.0 |
| R1 (Gig0/0/1) | 192.168.10.1 | 255.255.255.0 |
| R1 (Gig0/0/2) | 192.168.20.1 | 255.255.255.0 |
| R1 (Gig0/0/0) | 192.168.30.1 | 255.255.255.0 |
| PC20 (Fa0) | 192.168.20.10 | 255.255.255.0 |
| R2 (Gig0/0/0) | 192.168.30.2 | 255.255.255.0 |
| R2 (Gig0/0/1) | 192.168.40.1 | 255.255.255.0 |
| PC40 (Fa0) | 192.168.40.10 | 255.255.255.0 |
| R2 (Gig0/0/2) | 192.168.50.1 | 255.255.255.0 |
| PC50 (Fa0) | 192.168.50.10 | 255.255.255.0 |
Configuration of Routers
Static routes will be configured using the next-hop IP to ensure connectivity between networks.
Router R1 Configuration
- Set Hostname:
- Configure Interfaces:
- Gig0/0/1 (connected to 192.168.10.0/24):
- Gig0/0/2 (connected to 192.168.20.0/24):
- Gig0/0/0 (connected to 192.168.30.0/24 – R2):
- Configure Static Routes: To enable communication with the networks on R2 (192.168.40.0/24 and 192.168.50.0/24), static routes are added using the next-hop IP (192.168.30.2):
Router R2 Configuration
- Set Hostname:
- Configure Interfaces:
- Gig0/0/1 (connected to 192.168.40.0/24):
- Gig0/0/2 (connected to 192.168.50.0/24):
- Gig0/0/0 (connected to 192.168.30.0/24 – R1):
- Configure Static Routes: To enable communication with the networks on R1 (192.168.10.0/24 and 192.168.20.0/24), static routes are added using the next-hop IP (192.168.30.1):
Verification of Static Routing
Once the configurations are complete, verify connectivity between networks:
- Ping from PC10 (192.168.10.10) to PC50 (192.168.50.10):
The ping should be successful if routing is configured correctly.
- Check Routing Tables: On R1:
On R2:
Key Points to Remember
- Next-Hop IP: When configuring static routes, always ensure the next-hop IP is reachable. For example, on R1, the next-hop IP for networks on R2 is 192.168.30.2.
- Subnet Mask: Ensure that subnet masks are consistent and correctly configured across all interfaces.
- Interface Status: All interfaces must be enabled (using
no shutdown) for successful communication. - Testing: Always verify connectivity between devices after completing the configuration.
This concludes the step-by-step guide on configuring static routing with next-hop IP for IPv4. With proper static routing, seamless communication across networks is achievable, providing a robust foundation for managing and troubleshooting routed networks.